

Scroll down for English version
Il mese di Febbraio per me è sempre molto impegnativo, perché c’è
il mio compleannoe quindi organizzo sempre qualcosa. Sono uscita fuori da dieci
giorni pieni di auguri,, feste, pranzi, amici, baci e abbracci…e soprattutto
ore ore ore e ore passate tra i miei fornelli, in cuina, a tirare fuori
caccavelle, attrezzini, varie visite dal macellaio, fruttivendolo di fiducia
…insomma…. Avete capito come mai dal primo del mese io non abbia postato più
nulla…ma ora ho un archivio di ricette che la metà basta .
E’ la prima volta che partecipo all’MTC e ho la possibilità di fare
assaggiare la mia ricetta direttamente al terzo giudice. Non era previsto, non
è una forma di corruzione (anche se a dire il vero…. Visto che c’ero!!
Ahahahahaha), ma prima che a gennaio decretassero che la vincitrice sarebbe
stata Stefania l’avevo già invitata a trascorrere il weekend prima del mio
compleanno da noi sapendo che avrebbe avuto il ponte di Carnevale a scuola! La
scelta di provare la ricetta delle sua Red
Velvet gluten free è poi stata
naturale .
La Red Velvet è un dolce che amo molto come il paese da dove
proviene, gli Stati Uniti d’America, la presenza di determinati ingredienti al
suo interno fanno si che a differenza di molte torte da decorare
d’oltreoceano resti umida e si presti a
svariati tipi di farcia. Trovo sia una torta facile e veloce, basta avere delle
fruste elettriche e avere tutti gli ingredienti pronti e pesati, accendere il
forno, preparare le teglie o come nel caso di questa mia versione le leccarde
del forno con della carta forno
Con questa ricetta partecipo all’MTC di febbraio 2013
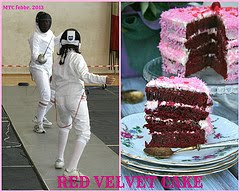
RED VELVET CAKE gluten free (come da ricetta di Cardamomo &co.)
160 gr di farina di riso sottilissima tipo amido (Alce Nero)
60 gr di fecola ( Pedon)
30 gr di amido di mais
1/2 cucchiaino di sale
8 gr cacao amaro (Perugina)
110 gr burro non salato a temperatura ambiente
300 gr di zucchero
3 uova medie
1 cucchiaino da caffè di estratto vaniglia bourbon
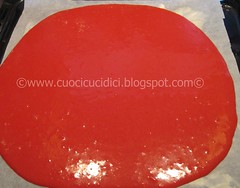
1 cucchiaio di colorante rosso “No Taste Red” Wilton
1 cucchiaino di aceto bianco
1 cucchiaino di bicarbonato di sodio
Preriscaldate il forno a
175°C.
NOTA : se non ho segnato
tutte le marche dei prodotti utilizzati è solo perché ho chiesto direttamente a
Stefania se erano tutti ingredienti gluten free …e ci sono stata attentissima,
visto che questi cuoricini li avrebbero mangiati lei e il suo pargolo n.3 !
Preparate e pesate tutti
gli ingredienti. Io ho lavorato tutto con le fruste elettriche.
In un recipiente mescolate le farine, il
sale, il cacao.
In un altro recipiente, sbattete il burro per
2-3 minuti, finché sarà soffice e poi aggiungete lo zucchero e sbattete per
altri 3 minuti.
Aggiungete le uova, una
alla volta, sbattendo 30 secondi dopo ogni aggiunta.
Mescolate il colorante al
buttermilk e quindi versate poco per volta al composto di burro, alternando le
farine al buttermilk ,
possibilmente iniziate e
finite con la farina.
In un bicchiere mescolate
il bicarbonato all’aceto bianco, facendo attenzione a versarlo subito
nell'impasto (altrimenti ve lo troverete per tutta la cucina) e incorporatelo
bene con una spatola.
Versate il composto
dividendolo per le due leccarde ed infornate, poiché l’impasto si allargherà ,
lo spessore sarà molto basso, ma è proprio così che lo desideravo. Cuocete per
circa 10 minuti, cioè quando vedrete che i bordi cominciano a colorarsi .
Questo è importante per mantenere il colore di un bel rosso. Più cuocete l’impasto
più tenderà al marrone e quindi perderà la sua caratteristica di RED. Lasciate
raffreddare la torta sulla carta forno per 10 minuti e poi staccate le due basi
leggermente.
Prendete le due leccarde
del forno, copritele con due fogli di carta forno e ungetele con un velo di
burro.
Preparate e pesate tutti
gli ingredienti. Io ho lavorato tutto con le fruste elettriche.
Il trucco sta nel chiudere
le basi in pellicola trasparente e passarle almeno 2 ore in freezer (la
versatilità della RV sta proprio nel fatto che la si può preparare e congelare
fino a due settimane senza perdere nulla della sua bontà , quindi è comoda per
portarsi avanti il lavoro con un certo anticipo).
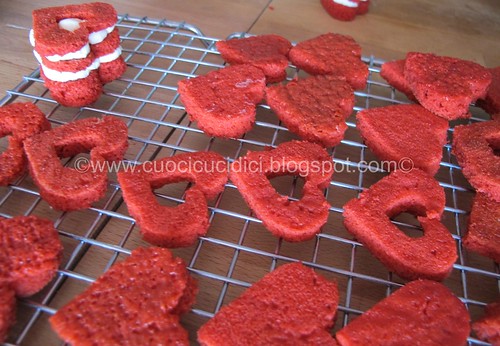
Con un cutter (nel mio caso a cuore) tagliare
tanti “cuoricini”.
CREMA AL PHILADELPHIA di
Buddy Valastro
450 gr di formaggio
Philadelphia
115 gr di burro non salato
ammorbidito a temp/ambiente
1 cucchiaino di estratto
naturale di vaniglia
200 gr zucchero a velo
(setacciato)
Mettere il formaggio
cremoso e il burro nel contenitore della planetaria e con la frusta a foglia
mescolare a velocità media per circa 30 secondi finoa quando il composto non sarà cremoso.
Con la frusta in movimento
versare la vaniglia e lavorare altri 30 secondi. Aggiungere lo zucchero un po'
alla volta e mescolare circa un minuto dopo l'ultima aggiunta, fino a quando il
composto non sarà bello liscio.
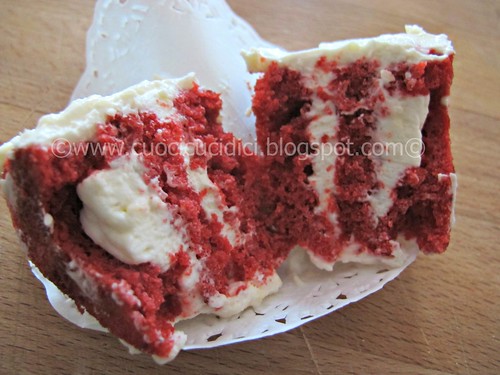
ASSEMBLAGGIO:
prendete un cuoricino ,
farcitelo con un cucchiaino di crema al formaggio, mettete un altro dischetto
di RV e un altro cucchiaino di farcia, coprite con un cuoricino a cui avrete
tolto la parte centrale; ricoprite solo la parte laterale così da lasciare la
parte superiore a vista .
NOTE MIE: di solito queste
creme le faccio con le fruste elettriche
e per un po' di tempo in più. Il segreto sta nell'eliminare bene i
residui del burro.
Questa crema se notate ha
una proporzione di burro inferiore ad
altre creme al formaggio
Questa è una torta
abbastanza umida che non ha bisogno di essere bagnata per essere farcita,
quindi si presta splendidamente alle torte in pasta di zucchero. Ma se lo scopo
vostro, non è rivestirle, potete bagnare un po' gli strati, per renderla più
simile al sapore delle nostre torte.
English version
February is a very busy
month for me, it’s my birthday month and I have always so many things to do…I
usually have parties, and the laste ten days were dedicated to organize a
brunch for twenty friends and a party for 45 people last Saturday… everythng
was excellent , but of course I couldn’t have spent time on my blog. Anyway now
I have a lot of new recipes to post.
Today I post my first
version of a gluten free Red Velvet cake
for my celiac friend Stefania..it was a great success J .
GLUTEN FREE RED VELVET CAKE
(the recipe for the base of
the cake is from Cardamomo & co. )
1 + 1/3 cup rice flour
4 Tbsp potato starch
2 Tbsp corn starch
1/2 cup butter
1 1/2 cups granulated sugar
3 eggs
1 tablespoon Red (no-taste) Icing Color Wilton
1 teaspoon pure vanilla extract
1 ½ tsp cocoa powder
1 teaspoon salt
1 cup buttermilk
1 1/2 teaspoons baking soda
1 tablespoon white vinegar
Preheat the oven to 340°F .
Take the two oven pans, cover them with two sheets of parchment
paper and grease them with some butter.
Prepare and weigh all the ingredients. I have worked with all
electric whisk.
In a bowl mix flours , salt and cocoa.
In another bowl, beat the
butter for 2-3 minutes, until it is soft, then add sugar and beat for other 3
minutes.
Add the eggs, one at a time, beating 30 seconds after each
addition.
Mix icing color with buttermilk.
Pour the buttermilk a little at a time to the butter mixture and
flours , alternatively. Possibly begin and end with the flours.
In a glass mix baking soda with white vinegar, making sure to pour in
the mixture immediately and incorporate it well with a spatula.
Pour the mixture divided by the two oven pans and bake, because the dough will spread, the
thickness is very low, but that's exactly what I wanted. Cook for about 10
minutes, that is when you will see that the edges begin to color. This is
important to keep the color of a beautiful red. More cook the dough and more it
will tend more to brown and then lose
its status of RED. Let the cake cool on baking paper for 10 minutes and then
unplug the two bases slightly.
The trick is to close cakess in plastic wrap and put them at least 2 hours in the freezer (the
versatility of the RV lies in the fact that you can prepare and freezeit even for up to two weeks without losing any of its
goodness, so it is convenient to bake forward well in advance).
With a cutter (in my case a
heart) cut many "hearts".
For my challenge I used
PHILADELPHIA CREAM Buddy Valastro
1 cup + 2/3 cups Philadelphia cheese
1 stick unsalted butter,
softened at room temperature
1 teaspoon pure vanilla extract
1 +2/3 cups icing sugar
(sifted)
Wisk the cream cheese and
butter for about 30 seconds till when
the mixture is creamy.
Whip in motion, pour the vanilla and work another 30 seconds. Add
the sugar a bit 'at a time and stir about one minute after the last addition,
until the mixture is nice and smooth.
Take a heart, stuff it with a teaspoon of cream cheese, put another
disk RV and another teaspoon of the filling, cover with a little heart to which
you have taken the central part; then cover only the sides so as to leave the
upper part view.
Have a nice week, xoxoxoxoxo


